Sabtu, 16 April 2011

SKULL FLAMING

tFinal Image Preview

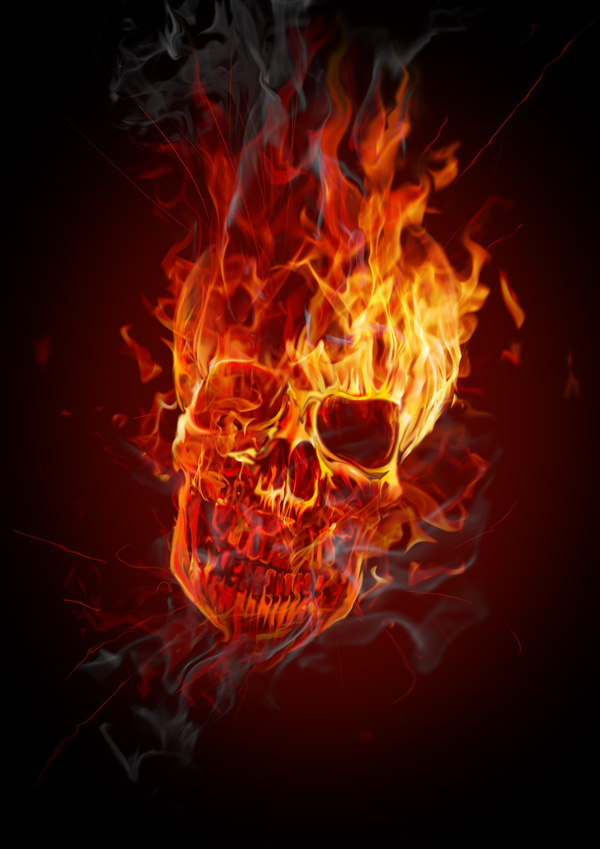
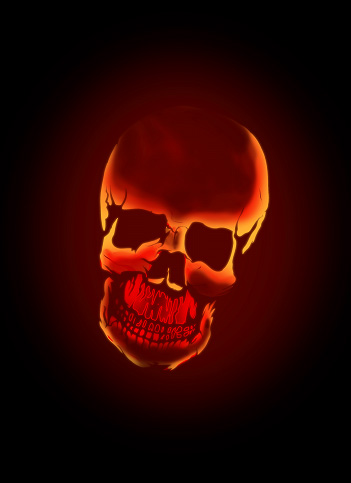
Take a look at the image we’ll be creating. Want access to the full PSD files and downloadable copies of every tutorial, including this one? Join Psd Plus for just $9/month. You can view the final image preview below.
skull on fire

Step 1

For this tutorial, I used Photoshop CS3, a skull from Designious.com (you could choose to use a free skull though, such as Skull Vector Pack 1) and some hi-res flames images. The high-res image files are available to Psd Plus members in the download pack. Though non-members are certainly welcome to shoot your own flame photos or find some stock to use here, so you can follow along.
To get things started, create a new document 210mm by 290mm with a 100% black background.

Step 2

Copy (Command + C) and paste (Command + V) the vector from Illustrator to Photoshop as pixels.
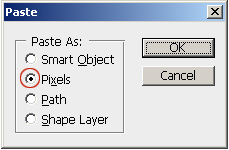
Step 3

On a new layer create an ellipse filled with dark red (#4c0400) that surrounds the skull. Next, apply a Gaussian Blur of 250px (maximum value), and place that layer under the skull.
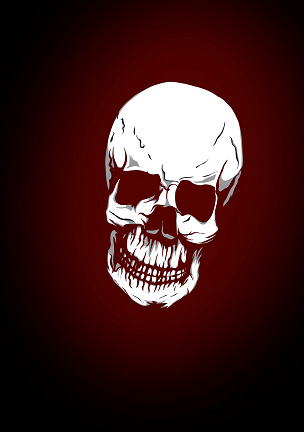
Step 4

Let’s prepare the skull for the flames. Select the white color from the skull. (Select > Color Range) and fill it with an orange-yellow color(#f9ae31), except the teeth and mandible that will be filled with light red (#e82b19).
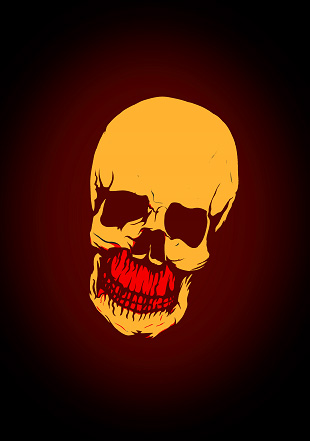
Step 5

Select the red area using Select > Color Range and then contract using Select > Contract > with 4 px, then and Delete.

Step 6

Select the yellow color. Next use a Brush with Toll on 250-300 px, Hardness of 0, Opacity at 10-15%, red for the color (d02207), and gradually color from the interior towards the exterior, until you get a skull with a bit of glow.

Step 7

Lets try to add some volume to the skull. Use the Eraser Tool with a diameter of 200px, Hardness of 0, and Opacity of 70%, and erase some of the red. Here we establish the lighter and darker parts of the skull so we can see some volume.

Step 8

Now double the Skull layer. Select the skull closest to the background and apply a Gaussian Blur of 8-10 px to create a glow.
Select the area under the nose including the teeth. Now grab a 80px Brush with a color of red (#d02207). Brush color on the right and left sides creating a soft gradient that ads depth to the lower part of the skull.

Step 9

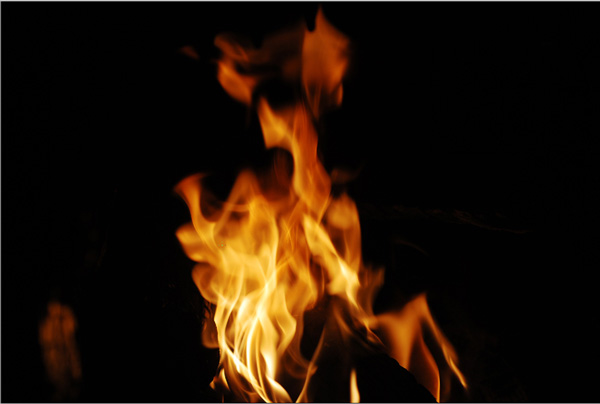
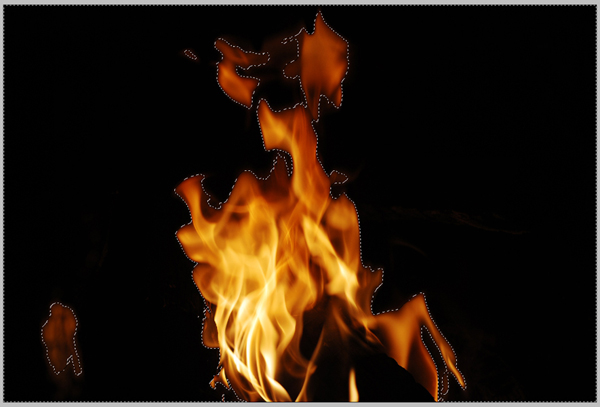
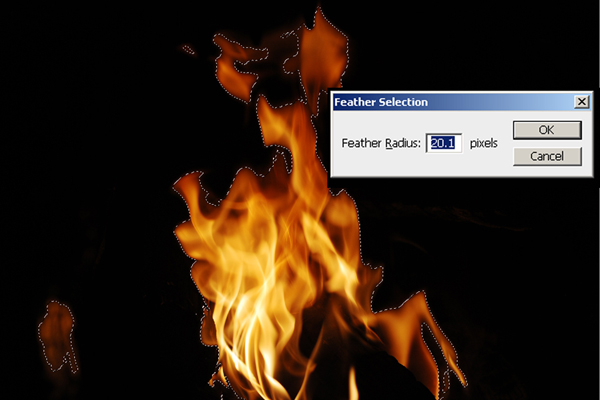
Now that we have a hot skull on our screen, let’s start the fire! Open the files with the flames and prepare each of them to be used on our image as follows:
A. Open the flames files.
B. Go to Select > Color Range, and select the darker area of the background. Next, Invert the selection (Command + Shift + I).


C. Go to Select > Modify > Feather, and set to about 20px. Then drag and drop them into our main skull document.
D. Set the blend modes to Screen or Lighten.
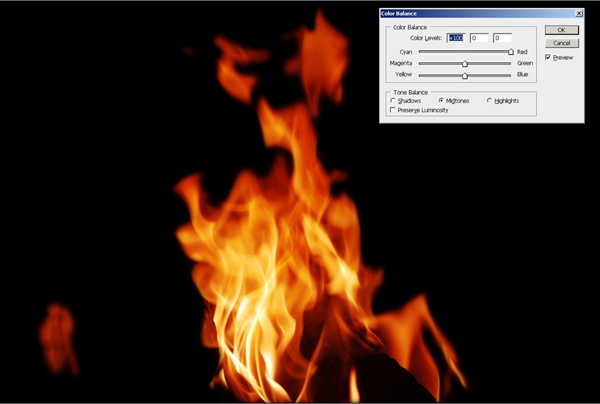
E. For the flames that will have other flames on top of them, we’ll need to adjust the color Balance. You can do this by going to Image > Adjustments > Color Balance (Command + B).

Step 10

Use the Free Transform Tool (Command + T) to arrange each flame into the desired position and the desired proportions.
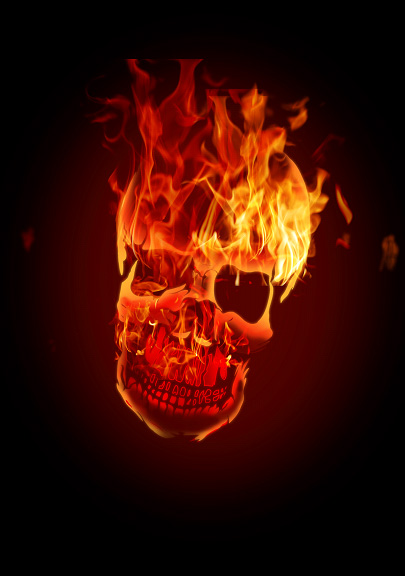
Step 11

Notice that the teeth area looks a bit darker than the rest of the skull so using the Brush Tool(B) and yellow (d02207) you lighten some parts of the teeth so they can blend better with the flames.

Step 12

Use the Smudge Tool (R) on the flames near the eyeballs to make them touch the skull so that you create a smooth transition from the skull to the flames.

Step 13

Use the Smudge Tool (R) to make the yellow parts of the skull blend with the base of the flames.
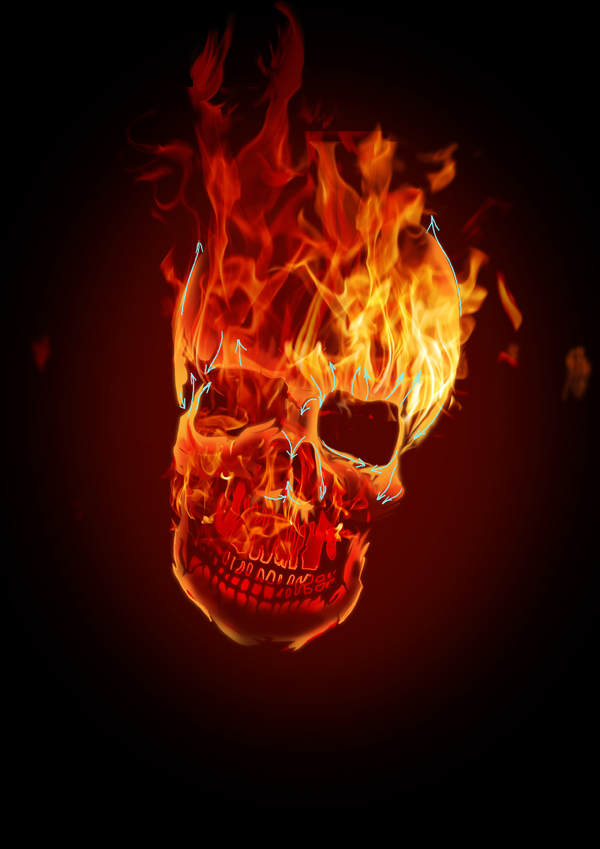
Step 14

Use the Smudge Tool again in the red areas from the shadow where you try to draw a contour going towards the dark areas.
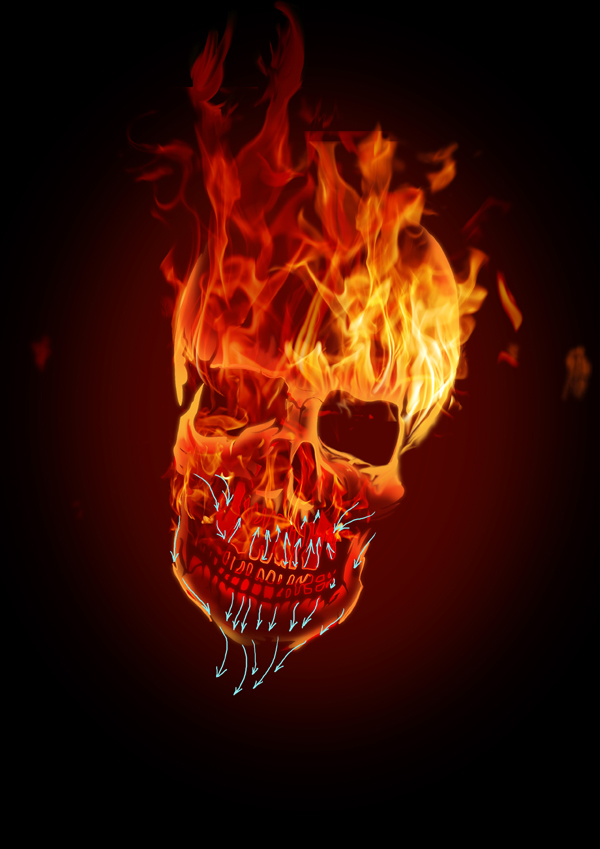
Step 15

Use the Dodge Tool (O) to enhance the glowing effect on the edges of the skull.

Step 16

Use the Burn Tool to work on the shadow areas of the contour so you can smoothen the passes from light to dark.
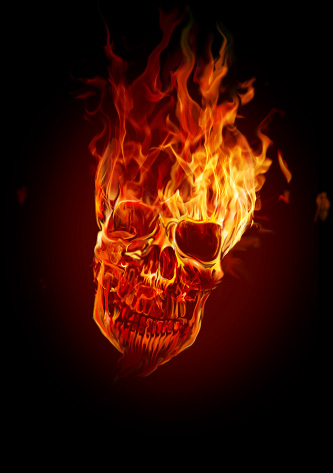
Step 17

Now for the smoke. To create the smoke, use the same flame images and apply the same techniques you did in Steps 10 and 11 to them. The difference here though is that you’ll need to desaturate these images to make them look like smoke. You can do this by going to Image > Adjustments > Hue/Saturation > Desaturate (Command + U), then set it to -100 for Saturation, and -16 for Luminosity.
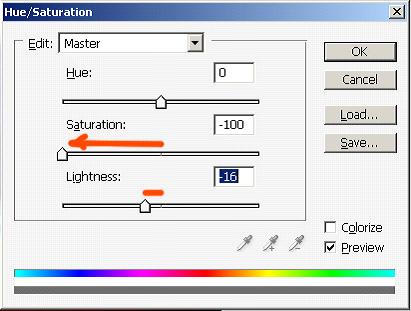
Step 18

Now lets apply a 2px Blur filter on the smoke so it blends better. Do this by going to Filter > Blur > Gaussian Blur.
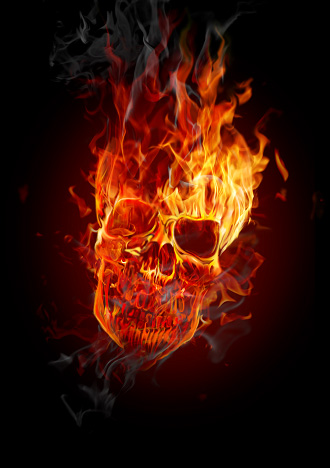
Conclusion

Now the sparks! Using a Brush of 3px with 100% Hardness and 100% Opacity you start drawing the sparks. You can alter some of them using the Smudge Tool (R). And that puts the finishing touches on this image.
Subscribe to the Psdtuts+ RSS Feed for the best Photoshop tuts and articles on the web.

  1. Create a new Photoshop picture with a black background.
  2. 2
    Create a 'Rounded Rectangle' by clicking on the shape tool in the task bar on the left hand side.
    Description
    Description
  3. 3
    Ensure the 'shape' layer is selected, and click on 'Filter', then 'Stylize', then 'Wind'. Do not be alarmed when an error message appears, asking if you want to 'Rasterize' the shape. Simply click OK.
  4. 4
    Another Box will appear. Make sure the selected settings areas follows: 'Wind' and 'From the Right', then click OK.
  5. 5
    Press 'Ctrl'+'F' twice. This redoes the 'Wind' effect.
    Description
    Description
  6. Click on 'Edit', then 'Transform', then 'Rotate 90 Degrees CW'.
    Description
    Description
  7. Click on 'Filter', then 'Liquify'. A window will open and, after making sure that the brush size is 25, click and drag on the lines made by the wind to distort them into what a flame may bear resemblance to. Once you have done this, click OK. It might not look much like fire right now, but don't give up.
  8. Click on 'Filter' 'Blur', then 'Gaussian Blur' and set the radius to 1 pixel.
  9. Duplicate the layer twice.
    Description
    Description
  10. 10
    Make the top 2 layers invisible by clicking on the eye next to them, then click on 'Image', then 'Adjustments', then 'Hue/Saturation'. Tick the 'Colorize' box, then set the variables as following: Hue: 360, Saturation: 100, Lightness: -50. This will turn it a deep red hue.
  11. Do the same on the top layer, except change the variables to: Hue: 50, Saturation: 100, Lightness: -50. This will make it a yellow color.
    Description
    Description
  12. Select the remaining white shape. Click on 'Filter', then 'Blur', then 'Gaussian Blur'. Set the radius to 7 pixels.
  13. Select the top Layer and change the layer type by clicking in the drop-down menu that usually reads 'Normal' and select 'Overlay'.
  14. Congratulate yourself! The work is done, and your masterpiece is completed!
    description

FLAME

This is a simple way of making a smokey-fire effect using Adobe Photo shop. It's easy to do and ideal for learners.

 Steps


  1. 1
    Open Adobe Photoshop and change the background colour to black, and the foreground colour to orange.

    Flame Protective Clothing

    Nomex Flame Resistant Suits Offer A Perfect Blend Of Safety & Comfort.
    www.dupont.com/Thermal-Protection
  2. Open a new file and click the "Preset Sizes" drop down arrow and select "Default Photo shop Size". Under "Contents" select "Background color" and click "OK"
  3. Select the paintbrush tool and draw random lines on the canvas.
  4. Go to "Filters" on the top toolbar and go down to "Render" and select Clouds.
  5. Save as "Fire"

Hell of Tutorial in Photoshop

Step 1

The first thing you will have to do is create the 3D text. To do that you can use Illustrator. It has a very nice 3D filter and it will work just fine.
Type the text you want and go to Effect>3D>Extrude & Bevel. Change the Position to Off-Axix Bottom. Then you just rotate the X,Y, and X Axis until you get the result you want. Follow the image below for reference. Tip: It's very important that you select Draw Hidden Faces. Otherwise Illustrator will not create some faces that will be very important for the end result.
Hell of Tutorial in Photoshop

Step 2

Now you will have to expand the 3D effect in order to select and change the color of the faces you want. Go to Obejct>Expand Appearance. First select the top faces, and move them away. Then select just the outer faces and fill them with black.
Hell of Tutorial in Photoshop

Step 3 - Photoshop

Create a new document in Photoshop and fill the background with Black. Copy the 3D text without the top faces and paste it in Phothoshop. Position it in the middle of the document and reduce its size.
Hell of Tutorial in Photoshop

Step 4

With the Magic Wand Tool (W) select the black faces and delete them.
Hell of Tutorial in Photoshop

Step 5

Go to Images>Adjustments>Hue/Saturation, change the color of the text to Orange.
Hell of Tutorial in Photoshop

Step 6

Make sure you have black and white for the background and foreground colors. Then go to Filter>Render>Clouds... After that, resize the layer. Make it smaller just to cover the word. Then just change the Blend Mode to Color Dodge
Hell of Tutorial in Photoshop

Step 7

Now create a new layer on top of the others and fill it with black, then with the Brush Tool (B) select a regular brush, very soft, like 0% hardness, and white for the color. Then just paint over some ares to make them brighter. (1-4)
Hell of Tutorial in Photoshop

Step 8

Apply a Layer Style to the 3D word, use Stroke with 1px Size, 40% Opacity and Black for the color.
Hell of Tutorial in Photoshop

Step 9

Let's add a Gradient Overlay to the background. It will be necessary in order to make some of the light effects work. Use Radial for the Style and use Black and #412e1d(brown) for the colors.
Hell of Tutorial in Photoshop

Step 10

Now duplicate the 3D layer and go to Filter>Blur>Gaussian Blur use 30px for the Radius. Position this layer beneath the Hell layer.
Hell of Tutorial in Photoshop

Step 11

With the Ellipse Tool(U) create an ellipse like the image below, then go to Filter>Blur>Gaussian Blur. Use 70px for the Radius. After that, just change the Blend Mode to Overlay.
Hell of Tutorial in Photoshop

Step 12

Create a new layer on top of the Backgroud layer. Fill it with white and go to Filter>Texture>Texturizer. Use 60% for Scaling, 15 for the Relief and Top for the Light. Change the Blend Mode to Multiply.
Hell of Tutorial in Photoshop

Step 13

Here I wanted to add a nice texture to the floor, so I used a wooden texture. You can find the one I used at http://www.sxc.hu/photo/947335. Or you can check the Great Wood Textures at http://abduzeedo.com/great-wood-textures.
Paste the image in the document and resize it to make it cover the gradient area. Then go to Edit>Transform>Distort. Move the vertices to apply a nice perspective to the wood. After that just change the Blend Mode to Multiply.
Hell of Tutorial in Photoshop

Step 14 - Fire

Now let's create the fire. To do that I will use what I learnt from the awesome Dramatic Text on Fire Effect in Photoshop by Collis from PSDTUTS.com. Basically we will get a photo of fire with flames and use the Warp tool to create different variations of the flame.
Download the image at http://www.sxc.hu/photo/985088 and paste it in the document. Make sure that it's in front of the other layes. Then with the Eraser Tool (E) delete some areas. Also go to Edit>Transform>Warp and distort the flame to get a nice effect. Then just change the Blend Mode to Screen.
Hell of Tutorial in Photoshop

Step 15

Create more flames using the same technique, you can even use the Smudge Tool (R) to change the form of the flames.
Hell of Tutorial in Photoshop

Step 16

Create a new layer in front of the other layers and go to Filter>Render>Clouds. Make sure you have selected Black and White for the Background and Foreground colors. Then you can resize the layer a bit to make the smoke smaller. With the Eraser Tool (E) delete some areas and just leave smoke over the text. Then change the Blend Mode to Soft Light.
Hell of Tutorial in Photoshop

Step 17

Repeat the same thing as the previous step, this time however use Hard Light for the Blend Mode. This step will create a more volumetric smoke to the image.
Hell of Tutorial in Photoshop

Step 18

Let's create the cracks on the floor. To do that let's use another image from sxc.hu, you can download it at http://www.sxc.hu/photo/995884. Place the image on the document and resize it to cover the gradient area. Then like we did before with the wood texture, go to Edit>Transform>Distort. Distort the image until you get a nice perspective, then change the Blend Mode to Multiply.
Hell of Tutorial in Photoshop

Step 19

This step might look complicated but it's not. Actually it's quite simple. Duplicate the crack layer and change the blend mode to Normal again. Go to Image>Adjustments>Invert, then go to Image>Adjustments>Desaturate. This will invert the colors so what was once black will now become white and vice-versa. Now go to Image>Adjustments>Levels and use 40, 1.00, and 226.
Right after that select the Magic Wand Tool (W) and select the black part of the image. Then go to Select>Similar, Photoshop will select all the black from the layer. Then delete the blacks and you will have the cracks in white. Now just apply a Layer Style. Go to Layer>Layer Styles>Color Overlay. Use #ffba00 for the color.
Hell of Tutorial in Photoshop

Step 20

Select the Eraser Tool (E) with a big soft brush, use 0% hardness. Then start deleting the layer. Leave just a small area close to the word. After that go to Filter>Blur>Gaussian Blur. Use a small value 0.5%. Then the last thing here, move this layer 2 pixels left and bottom, so it will create a nice 3D effect.
Hell of Tutorial in Photoshop

Step 21

Here you can duplicate the yellow crack layer and apply a another gaussian blur, this time use a greater value and change the Blend Mode to Color Dodge. If you want you can duplicate it one or two more times to make the effect brighter.
Hell of Tutorial in Photoshop

Conclusion

You can add more cracks or change the flames, now it's up to you. The idea of this tutorial was to create an image using fire coming from hell, like a deeper place using 3D typography. It's basically a mix of tutorials and techniques. It's all about playing and looking on the web, there are really great tutorials out there.
Hell of Tutorial in PhotoshopClick on the image to see a full preview